November 1, 2012

Baby Boy’s Airplane Nursery

by Melissa {The Dominion Project}

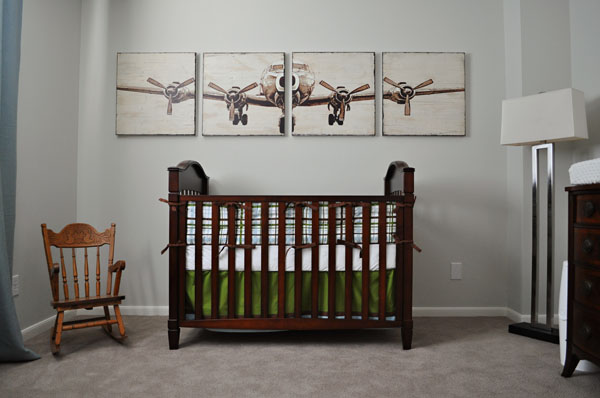
First day of maternity leave and no baby.  He’s not due for a few more days, but Ethan and I fully expected him to be here by now, so our big to-do lists are pretty much wrapped up. And that includes finishing the nursery. While it’s not 100% finished, I’m pretty happy with where we stand – all the essentials (and then some) have been taken care of – we’re just lacking some artwork and other finishing touches. Since I suddenly have all this time on my hands without the stress and busyness of work, I figured I’d snap some photos to share!

When we found out “baby” was a boy (we’ve yet to decide on a name but we’re down to a few solid options!), we decided this airplane art was a must. Then I hunted down the Land of Nod bedding on Ebay for a steal. I wanted something “boy” without being overly theme-y and the plaid is just perfect. Everything else pretty much fell together from there. The rocking chair was Ethan’s when he was a kid. Isn’t it too cute? :)

I wanted a nice wood dresser that could be used in a non-nursery room down the road, and found this guy on craigslist for just $100. It was in pretty rough shape when we picked it up, but thankfully my carpet vendor told me about Howard’s Restor A Finish and it worked like a charm! I wish I’d taken before and after photos, but third trimester exhaustion got the best of me. Basically, you rub down the wood with the stain and some super fine steel wool. After it’s dry, you buff the piece with Howard’s protective wax and it’s good as new! I think the whole project only took Ethan and his dad around 3 or 4 hours.

Can you tell I’m still experimenting with artwork over the dresser? The green and white pattern in that frame is a fabric sample…one of the patterns I was considering for draperies before I had a complete pregnant-lady meltdown one Saturday and decided I just HAD to get treatments on the window that very day. (As in, I could not have this baby unless the window was covered, end of story.) It’s a good thing High Fashion Home had linen panels in the right color blue. And they were much cheaper than custom draperies anyway!

My sweet friend Hannah got this wood airplane mobile for us and it’s just perfect for above the changing pad! Hopefully this kid will be sufficiently distracted during diaper changes. :) And for all those concerned, it’s really well anchored into the ceiling. Not going anywhere.

My big splurge for the room was the glider and ottoman. I really loved this one from Pottery Barn and this one from Crate and Barrel (along with a few more expensive ones), but just couldn’t bring myself to drop that kind of cash. So I was ecstatic when I found this set at a local baby store for much less. And the neutral linen is perfect for wherever it ends up down the road – I’m thinking a reading corner in our bedroom, one day when we’re past the baby stage. I still need to figure out a skirt/cover for that cardboard base table next to the chair, but I’m just not in a sewing mood…so it will just have to wait.

And I love the little reading wall we made between the two closet doors. I picked up the baskets at Home Goods a loooong time ago, and they’re just been waiting for a home. After getting a TON of books at one of our showers (such a fun idea!) and some inspiration from this blog post, it just came together. Obviously I still need some artwork above the baskets. Just waiting for inspiration to strike…

***

Wall Color: Benjamin Moore, November Rain | Crib: Carter’s (via Sears) | Bedding: Land of Nod, Clothes Make the Crib (no longer available) | Airplane Panels: Pottery Barn | Glider and Ottoman: Baby’s 1st Furniture | Dresser: craigslist | Airplane Mobile: Etsy (gift) | Draperies: High Fashion Home

August 29, 2012

New Carpet – A Sneak Peek

by Melissa {The Dominion Project}

Well, it’s not quite done (there are two guys working upstairs as I type this), but we are pretty darn close! The road to new carpet has been a long one, but we’re finally on the home stretch – check out our new and improved dining room!

More pics later…promise.

P.S. Did you notice the dining room is BLUE with a very WHITE wainscot!? (Check out the before in this post.) It’s been that way for months. I’m a little (a lot?) behind on blogging. Maybe one day, I’ll get around to giving you guys the play-by-play :)

August 10, 2012

Just Landed

by Melissa {The Dominion Project}

Check out the artwork that arrived yesterday for baby boy’s airplane room!

{planked airplane panels from Pottery Barn}

I was so excited that I ran upstairs to grab the crib bedding (yes, ran…Ethan told me to slow down…he was afraid I’d fall down the stairs…I’m not so solid on my feet these days!)

{Land of Nod “Clothes Make the Crib” – but got it for a steal on Ebay!}

There’s only one problem – now I’m not loving the wall color in the nursery. It’s a great neutral…just a little too cool. But until our glider comes in (4 to 6 more weeks!), I don’t want to make any major decisions.

{this style…in an oatmeal linen fabric}

Plus I’m tired of painting! Sorry for the terrible iPhone photos…that’s as much energy as I can muster these days! :)

June 25, 2012

Our Spring/Summer Garden

by Melissa {The Dominion Project}

Hi guys. Promise I haven’t completely forgotten about the blog. But things have been a little bit…um…crazy? Between the day job, all the projects we’ve been tackling around here and (most of all) Baby S on his way, I’ve just been exhausted and completely scatterbrained. I’ve probably worked on this post in spare moments at least a dozen times over the last month if that tells you anything!

But anyway…the only thing we’ve been semi-good about photographing for the past few months is our garden. I’m so excited that it’s actually producing veggies this year!! Last year we built the raised beds and attempted to fill them up, but we didn’t do any research. And we probably started too late for this Houston heat, so the results were pretty dismal. Vegetable gardening takes a little more effort than just throwing some seeds in the ground – who knew?

Ethan was determined to succeed this year, so he did the research and developed a plan – we’re pretty thrilled with the results! These photos are from the garden’s peak a month or so ago. Between this oppressive heat and my neglectful watering (oops), things aren’t quite as lush these days…but you get the idea.

Our #1 resource was this article on the Urban Harvest website – a Houston-based organization on a mission to educate home gardeners. The article explains how to rotate 4 plots in a small vegetable garden, taking advantage of crop pairings and the optimal time for planting in Houston’s climate. The plan is for a 200sf garden and since ours is only around 120sf, we modified the plan to fit our space. I’m a visual person – so of course I drew a diagram. :)

Ok, nothing exciting. But having a detailed action planned has really been key for us. I noted each month’s plantings on our family calendar (on the refrigerator) so we wouldn’t forget when to plant things, and six months in, we’re still going strong!

Another key for us was researching the seed varieties that would thrive in our hot, humid climate. This page on the Urban Harvest site was a great reference. For example, we chose an Asian cucumber variety (Suyo Long) because it is “very dependable in hot, humid climates.” Just what we needed.

We also have 8 or 9 plants tomato plants –  Celebrity, Cherokee Purple and Sweet 100’s.

Our crop has been a little out of control – so we’ve been making salsa!

Earlier in the year we planted Super Sugar Snap peas, which are long gone now in the summer heat. I was so amused by the way they “climbed” our chicken wire trellis. They made it all the way up our 6-7′ wall…and then some.

Right now, our Derby Bush Beans are taking over the spot where the Sugar Snaps used to live. They’re pretty much green beans – just a short bush variety that apparently likes the Houston climate (when you remember to water them…)

And onions too – we bought them on a whim when picking up some seeds at a local feed store. They’ve been pretty handy with all the salsa-making.

With 100 degree days upon us, I’m pretty sure all our plants are on their way out. Hopefully we’re as good in Sept/Oct when it’s time to tackle the fall plantings!

February 16, 2012

This Little Light of Mine

by Melissa {The Dominion Project}

Ok – confession time. I’m not perfect. I may be a professional, but that doesn’t mean I always make the right decision the first time around. Especially on my own house! My mind gets clouded by the same obstacles that everyone faces when renovating – money, time, amount of work, etc. But I guess that’s the point of blogging – to share all the ups and downs. And let me tell you, renovating the half bath has been chock-full of them!

See that round hole & painter’s tape on the wall above the mirror? That’s where a wall-mounted light should go. Around Thanksgiving, Ethan and I were desperately trying to finish this room before our holiday visitors arrived and finding a light was on the short list. So I did a quick internet search and bought this guy. It seemed to work with the faucet and it was cheap. Sold.

{pocelona chrome two light bath fixture via bellacor}

Then it arrived and I wasn’t so sure. It looked cheap and cheesy (go figure). But we installed it anyway. And guess what? I absolutely hated it. Ethan described it as “medicine-cabinet-y.” And that wasn’t doing it for me. This is the only photo I snapped of it, as I was running out the door in search of a better solution.

I headed straight for Circa Lighting (my absolute favorite lighting store!) and found a great fixture – the large cabinet maker’s picture light in a bronze finish. It costs twice (maybe 3 times?) as much as the ugly one, but I got a great deal on some other pieces in the room, so I figured I would just splurge!

{circa lighting cabinet makers picture lights}

The Houston store didn’t have the finish I wanted in stock, so I headed home to take some measurements and “make sure” before I ordered it online. It wouldn’t arrive before the Thanksgiving visitors, so my sense of urgency kind of disappeared.

During my “make sure” measurements, I realized the backplate on this light was rectangular, and the mounting plate we had on the wall was round (and much larger than the light backplate). If I wanted to install this cabinet maker’s light, I needed to find a new mounting bracket. Ethan and I were more than capable of pulling it off, but I just didn’t want to deal with it! I did a little searching for another light, but was never really happy with anything I found. So I decided to be indecisive and sit on my hands until the perfect solution magically appeared.

Yesterday was my lucky day! The Rejuvenation catalog showed up in my mailbox, and while I’d never heard of the company (you’d be amazed by the number of mailing lists I’m on), I thumbed through their catalog and found this beauty.

{turner light via rejuvenation}

You know the best part? The backplate is round and the perfect measurements for my already-installed  mounting bracket. I’m not sure if that’s lazy, resourceful, or purely a stroke of luck. Whatever it is, I’m crossing my fingers and hoping this fixture solves my bathroom lighting dilemma.

Want a quick piece of advice about bathroom lighting? Stay away from the ones designated “bathroom lights.” You can get a much more sophisticated look by using a decorative wall sconce or even a picture light (like the Circa lighting one). I knew this, but for some reason, defaulted to the chintzy bathroom light anyway. Why can’t I listen to my own advice??

Oh well. The Rejuvenation light is on its way, along with this gorgeous mirror that I’m beyond excited about! Stay tuned for install photos!